Monday, April 11, 2016

week13

Game ready Mesh -> Unity


Import multiple objs with one click:
ZPlugin-> MultiAppend->select all at once &open

Retopo

Fist step is to retopologize all the High Res details into the simplest version you possibly can... You can achieve that in couple different ways....

a retopologize program

-or-

a plugin in Maya for retopo

in ZBrush you can retopo with ZSphere topology...


UV


https://www.uvlayout.com/
for if UVMaster is not doing what you want

UV before sending to XNormal...


XN


to generate maps 


High Defenition Mesh -> Add Meshes..         you'd export the highest res Subdiv of every Subtool . ( ZBrush exports objs with polypaint). And bring it in here.
Low Defenition-> Add Mesh.... ( the one you retopologysed)
Baking Options...


NORMAL_

Click on the ...  to generate the Normal map. choose Tangent to create the Tangent Normal Map.


the settings for better results:
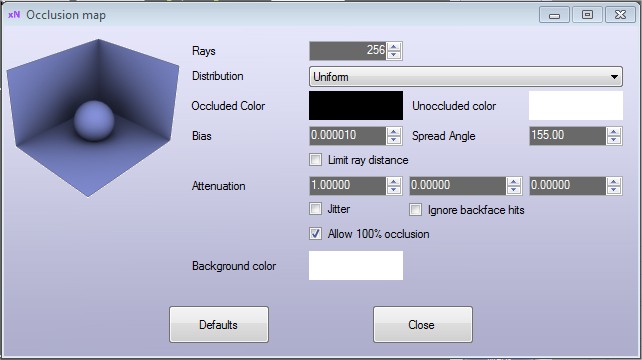


AO_

(where the light doesn't get)...as Shadows are too consistent => so AO works together with shadows

settings for better results:


HIGH POLYGON VERTEX COLORS_

Do this Map by itself. Separately from any other map. Because to make this one, go to the High definition Mesh and uncheck the "ignore vertex color".


Unity


Scene- where you move around and edit
Game window- what you will see in the game ( through the camera).

Assets - all meshes and maps

Right Click-> Create folder for model, for texture map, for normal map,....
In Models folder, import a new asset, select the LowPoly mesh
Now you can click on it and drag into the Scene.

To navigate:

ALT + right click - zoom
         + middle  - move
         + left - rotate


Material


Apply Maps to the Material

Maps-> click on the folder you've made,  Import Asset...\

Then select the Map you've imported, in the right menu choose the kind of the map you have just added.  Texture type->......
add all maps...

then go to the Material, select it and in the material menu on the right click on each kind of the map and choose from the quick menu

Camera


You can rotate and change Light, / Camera,/ etc

to operate camera:
Q- move
E - rotate
R - scale

Asset Store - the backplates in Camera Settings-> Skybox


Tuesday, April 5, 2016

focal length- zbrush comparison


An interesting comparison of real camera focal length and Zbrush viewport

Monday, April 4, 2016

week 12- 2

Rendering p 2

-ZBrush
-Photoshop


-ZBrush- 

Turn floor on.

1- Set up main Light

2- Look at your shadows.
Sharp? you want to blur it a bit?
Control the blur through Rays and Angles
Kill the darkness a bit.

Export Shadows as its own pass. ( just like everything else)

3- Different lights ( save them separately)

4- AO, SSS, Depth, etc


Open menu     - Render Passes- 

hit on each of the tabs to save.
After you saved Shadows, you can tern them off and rerender the Shaded pass without any shadows. Render AO, save
Render SSS.
Change lights- different sides(2 sides), rimm light,....

Assign a reflection material to render a Reflection pass. ( a lot of people assign black material and play with spec, then save it from the Shader pass)


Store views for in case you mess it up.

 Movie-> Timeline-> Make a dot
this way you snap a camera to one spot. ( and make as many of those as you want)

you can also save a Custom view in ZAppLink


- Photoshop-


Load all passes as Layers, manually load the grey scale passes such as AO, Shadows, SSS, Mask.

You can add Color to certain layers. Like to Shadows, Red->to SSS,...
You can assign different color to Shadows. Put them on Screen and play with Layers
*Purple to AO
Use with masking
Depth of field- for Blur

Document Size- the Size of the render, Make the object fill the Doc, the quality of render is regulated by the SPix in top right corner under BPR button. This is the only time you should use the document zoom buttons, cause as you resize the Doc to make it bigger, make sure to zoom out.


Rendering passes on Zbrush: RAPHAEL GRASSETI

https://www.youtube.com/watch?v=JxtBwcRXawE


week 12


Rendering


-Keyshot


When you send to Keyshot, make sure all subtools have different names. Otherwise it might not seee it.
Render-> External render->  KeyShot

Group by Material - doesnt group as subtools, but as pieces with different materials. (All subtools of one material will be all grouped together as one in Keyshot.

Shift +P - Pause render in Keyshot

then when you click on Render (BPR// Shift+R) , it will send the render job to Keyshot.

Whatever number of polygons you have in ZBrush, it doubles it in Keyshot. For fibers- it quadruples it ( converts to triangles-doubles the number + in BPR menu in render settings it says Subdiv at 2- double the number by 2 again, sides- adds on again...etc) dynamic- applies the dynamic to actual mesh and sends over.
This may cause problems...if your computer or Keyshot cant handle stuff....

When you send stuff to keyshot, open the Library menu and Project menu
Library- where you go, choose and apply thing to your scene
Project- where you edit all the stuff from Library that you have applied to model

If you dont want something to be sent, turn  the eyeball off of that subtool.You can go back and forth from ZBrush to Keyshot.
Better dont put the CPU usage to 100% unless you are ready to like go to sleep and not use any other programs.

Axelata Paint- the actual car paint, that would be exactly to real life.

Its all a click and drag system- you can apply it to individual subtools in the viewport or to the whole project all at once by dragging the material to the Project name ZBrush  in the Scene menu of the project.

Every time you move within Keyshot, it rerenders it real time.


Material


Right click on the subtool, copy material from one subtool, paste into new one. If you want to come back to the original ZBrush material, make a new Scene in Keyshot and resend the file from ZBrush.

When you apply a material and want to save the polypaint, hold ALT when applying the Keyshot material. (though it doestn work with materials like Glass, Liquid...and transparent materials alike that)


Roghness
- more like blur


Refraction index- the tightness of spec.

The two materials below are the same except the material on the left has a refraction index of 2.0. The material on the right has a refraction index of 1.2. The higher refraction index distorts light more and makes the material itself more reflective than the lower refraction index on the right.

https://www.keyshot.com/keyshot3/manual/material_types/refraction_index_parameter.html


material settings in KeyShot

You can upload textures. and move, position the Label on the material. You can make it a different material ( in KeyShot 6).
Save the img as PNG


Lighting


Click and drag.
Environments can be moved/ rotated/ adjust brightness etc. On the right- Project-Environment. It updates the lighting.
You can pick a different color or Backdrop as a bg instead of the lighting environment.  A different Environment can be used as a back plate as well- drag the Environment to the Backdrop tab.

You can use actual geometry as Lighting. -> Edit-> Add Geometry....
Or you can create the mesh in ZBrush, resend to Keyshot. Now you can use that as lighting by assigning a Light Material to it.  You can move the piece inside Keyshot- right click, move part.
To move everything- move all.
Material-> Light   *Emissive light material for soft adjustments. Area Light- to really use it As Light.

You can now edit it *color, intencity, visibility to camera, shadows,...


For Final Render - > Render settings
Passes * Clown Pass, Geo Pass, render region...etc


Edit HDRIs
you can regulate brightness, contrast,.....
add more lights by adding Pins


Cameras


you can lock it
Depth of field
....
etc


Passes


Normal pass, clown, depth and reflection passes.


-----
How to make letters
-
- Make a square b&w img,
load the Texture
- apply it on to a plane, load texture as a texture map. Then mask by intensity and Extract
Or
- make it an Alpha, ->Alpha pallette -> Make 3d
- draw it right on mesh with Alpha

----


how some people do it: